
Creating a Bevel Effect with the GIMP
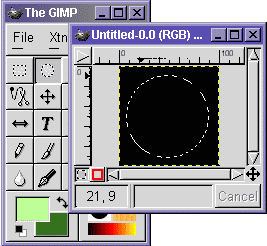
1. Making a Start
Create a new image with a black background. Pick a foreground and background colour (make the foreground a tint and the background a shade of your final intended effect - eg. light green and dark green). Use the ellipitical selection tool to draw a circular area on the image.
2. Paint the Base Surface
Double click the blend tool and set the Gradient to Radial (blend mode should be FG to BG). Drag the cursor from somewhere near the top left to the bottom right of the circle. This should make the circle look like a ball... if not, adjust the starting point and try again.

3. Take a Slice Off the Front
Use Select | Shrink to substantially reduce the selected area. Invert the foreground and background colours and set the blend tool's gradient to linear. Drag the cursor from the top left to bottom right of the new select. Now you have a globe with a slice taken off the front.

4. Make the Hole
Shrink the selection again, but only by a few pixels this time. Set the foreground colour to black and bucket fill the selection. Now select all (Ctrl-A) and you should see a disk with a hole in the middle, all neatly bevelled.

There's no reason why you shouldn't start off with a different shape or make lots of holes in it - just keep an eye on the blend from tint to shade to ensure that you are creating a 'realistic' 3d effect.